I love love love the chicken lettuce wraps from P.F. Chang's restaurant, so I was thrilled to come across this recipe in my "stack o' recipes". I found it in Taste of Home magazine a couple years ago and it turns out to be a Katie Lee recipe. I figure that I like her meatloaf so much, I'd probably like her lettuce wraps, too! First off, you have to know that she calls these "lettuce cups" and uses a narrow lettuce (like romaine or butter lettuce) for the "cups". I wanted "wraps" (and I was also in a hurry at the grocery store), so I just purchased a head of iceberg lettuce and carefully pulled the layers apart. I also thought this would be good as a salad, so I chopped up some iceberg, too, and that's how I ended up eating mine. It was super good and got an "A" from my hubby, too! Okay, onto the recipe...
Prep Time: 25 minutes
Cook Time: 20 minutes
Yield 6-8 servings (as lettuce cups) --- this pretty much fed my husband and myself as a regular meal.
1 packet stir-fry seasoning powder
1/4 cup water
2 T. soy sauce
2 T. lime juice
1 tsp. sugar
1 T. canola oil
1 lb. ground chicken
1 red bell pepper, diced
1/4 cup water chestnuts, diced
2 T. scallions, thinly sliced
Pinch of red pepper flakes
1 head of romaine or butter lettuce (inside leaves only) for the cups (or, as I was mentioning before, this is quite a versatile dish so do what you want with it)
For garnish: mint, cilantro, bean sprouts, chopped peanuts
In a small bowl, combine the stir-fry seasoning, water, soy sauce, lime juice and sugar. Set aside.
Heat oil in skillet over medium heat. Add chicken meat and cook until browned (breaking the meat up as you cook it), about 10 minutes. Add red pepper, water chestnuts, scallions and red pepper flakes and cook 5 minutes more. Stir in stir-fry seasoning mixture, and cook until liquid evaporates (about 2-3 minutes).
Serve in lettuce cups garnished with mint, cilantro, bean sprouts and peanuts.
I would have liked to find bean sprouts for this but as I mentioned before, I was very hurried at the store, so I only bought cilantro. This also used up a package of ground chicken from my freezer which was awesome. I had never bought a packet of stir-fry seasoning before and ended up finding it by the ethnic foods section of my grocery store, so keep that in mind as you're looking for it.
Here's how my "salad"/lettuce wraps turned out and it was SO delicious.
Can't wait to try this again and it makes a great summer-time dinner. Enjoy!
Showing posts with label chicken. Show all posts
Thursday, May 31, 2012
Wednesday, May 30, 2012
Risotto with Chicken & Asparagus
Awhile back, I was looking for some great "put-together-and-freeze" meals---much like they make at Let's Dish. My idea was to have a bunch of mommy friends over and we'd all put together meals for our families. I ended up finding this blog that is written by a mom with the same ideas as myself. I ended up printing a few recipes from her site but this is the first that I've tried. I decided to post this to my blog, too, because I did this a little differently---I didn't freeze it ahead of time. I just made it fresh. Okay, here's the recipe that I used:
(If you want the freezer version, please check out the other blog.)
3 cups cooked chicken breast, cubed
1 cup instant rice (uncooked)
3 T. chicken base (found by the broths in your local store)
2 tsp. minced garlic
1/4 black pepper
2 tsp. olive oil
1 cup fresh asparagus, chopped into 1/2 inch pieces
1 cup red bell pepper, chopped
1/2 cup shredded Parmesan cheese
1 cup bacon, cooked and crumbled
4 ounces cream cheese
Combine chicken, rice, chicken base, garlic, pepper and olive oil in large skillet. Add two cups of water to the skillet, cook on low-to-medium heat for about 20 minutes, or until the rice is cooked. Stir cream cheese, asparagus, red bell pepper and Parmesan into the rice mixture. Cook for 5 minutes, or until the cream cheese is melted and the vegetables are crisp tender. Sprinkle with bacon before serving.
Trying to stick with my resolution of using things I already had in my cupboard, I used frozen asparagus that I already had and the only things I had to buy were red pepper and chicken base (which I have never used before). I feel like I used a million pans while making this dish, just because I had to cook the bacon beforehand (I was out of the fully-cooked kind that I normally like to use for things like this) and I cooked the chicken in the crock pot during the day to save time. When everything was cooking, it smelled SO AMAZING. I couldn't resist taking a little taste test before I put the veggies in the skillet and everything tasted so good. HOWEVER, the end product was very salty to me. I have never had a Let's Dish meal before, so I'm not sure if they lean on the salty side of the pallet but this specific dish was quite salty. So, I suggest cutting the chicken base and the Parmesan by a third, therefore using only 2 T. of chicken base and 1/2 cup of Parmesan. I hope this makes it less salty so the flavor of the dish stands out more. All in all, I'd like to make this again because it has everything in it that I love. Enjoy!!
Monday, May 21, 2012
Santa Fe Chicken Enchilada Soup
Last week, I decided that I wanted to make something with the can of black beans from my pantry so I went on allrecipes.com and found this recipe. It was submitted by Philadelphia (the cream cheese company) and called for a container of one of their new "cooking cremes", which I have been meaning to try. Besides the cooking creme, I already had everything in the recipe...
I also had to run out and get some cilantro, which was totally worth it. (We love love love cilantro!) Okay, enough chatter---here's the recipe:
4 (6 inch) corn tortillas, cut into strips
1 teaspoon oil
1 lb. boneless skinless chicken breasts, cut into bite-sized pieces
1 (10 ounce) tub of Philadelphia Santa Fe Blend Cooking Creme
1 cup milk
1 (15 ounce) can black beans, rinsed
1 (11 ounce) can corn with red and green bell peppers, drained (aka "Mexicorn")
1 (14.5 ounce) can diced tomatoes, drained
1/4 cup chopped cilantro
Directions:
- Heat oven to 400*
-Toss tortilla strips in oil; spread into a single layer on baking sheet. Bake for 10-12 minutes or until crisp, stirring occasionally.
-Meanwhile, cook chicken in large nonstick saucepan sprayed with cooking spray on medium-high heat until chicken is done (about 8-10 minutes), stirring frequently. Stir in cooking creme, milk, beans, corn and tomatoes. Simmer on medium-low heat for 6-8 minutes or until heated through, stirring frequently.
-Serve soup topped with tortilla strips and cilantro.
So...of course I did a few things differently, as I usually do. :)
First, I already had a bag of white corn tortilla chips that we are trying to eat up, so I did not make the tortilla strips like the recipe calls for. I have, however, made them in the past and they are super easy and super delicious so I do recommend making them if you don't have tortilla chips on hand. Secondly, I cooked the chicken in the crock pot for this one and then just transferred it over to a smaller pot on the stove when it was closer to dinner time. A couple reasons why I did this:
1. In soups like this, I love when the chicken is more pulled/shredded than chunky. Probably just me, so go ahead and cook it like the instructions tell you to if you want.
2. It's so easy to cook chicken in a crock pot! I put the whole chicken breast in there with some water and chicken bullion and let it cook for about four hours on low. By then, all I had to do was break it up a little bit and it was ready to go! Once the chicken was transferred to the stove, it seriously took about 10 minutes to get the soup ready. Talk about awesome!!
Here's a little peek at the end result. I put cheese on mine, and didn't add any chips.
By the way, the soup wasn't spicy so even my toddler had two helpings of it. And don't skimp on the cilantro! It really does add a delicious flavor so it's well worth making a trip to the store if you don't already have some. Enjoy!!
Monday, May 14, 2012
Crock Pot Chicken with Stuffing
I found this recipe awhile ago on allrecipes.com and just so happened to have all of the ingredients...
I took a really neat picture of the ingredients sitting next to my crock pot, but of course I can't find it now, so I apologize for the lack of picture!!
I cannot express to you how very very easy this recipe is. Just take a pound of chicken breasts and put them in the crock pot. Pour a can of (condensed) cream of chicken soup over the chicken. In a bowl, mix 1-1/4 cups water, 1/4 cup melted butter and 1 (6 ounce) package of corn bread stuffing. Pour stuffing mixture over the chicken and the soup and cook on low for about 4 hours (or until chicken is cooked through).
Instead of corn bread stuffing, I used a box of regular Stove Top chicken flavored stuffing and it turned out wonderfully. The chicken wasn't anything super special but the stuffing really made this great. My kids will eat chicken without complaining so I knew that would be okay with them, and they ended up loving the stuffing so much that it was gone in a flash. The comments on this recipe stated that sometimes the "inventor" of the recipe puts two cans of soup in. I think I'd try that next time with double the amount of stuffing, since that was the real hit in our house. Enjoy!!
Monday, May 7, 2012
Whole Chicken in the Crock Pot
The other week, I bought a whole Gold 'n' Plump chicken (think rotisserie-sized) for 99 cents. I was pretty proud of myself because it involved doubling a coupon as well as taking advantage of a sale, and I threw it in our chest freezer for a rainy day. This weekend was pretty rainy....so it got me thinking about how I was going to cook that darn chicken. I decided that it would be oh so handy if I could just throw it in the crock pot and ta-da!! But, come on---how is THAT going to work?? Well, let's just say, it worked wonderfully, thank you very much.
I googled a basic crock pot recipe and came up with this unique technique. You're gonna think this is kinda cool so stick with me here. :)
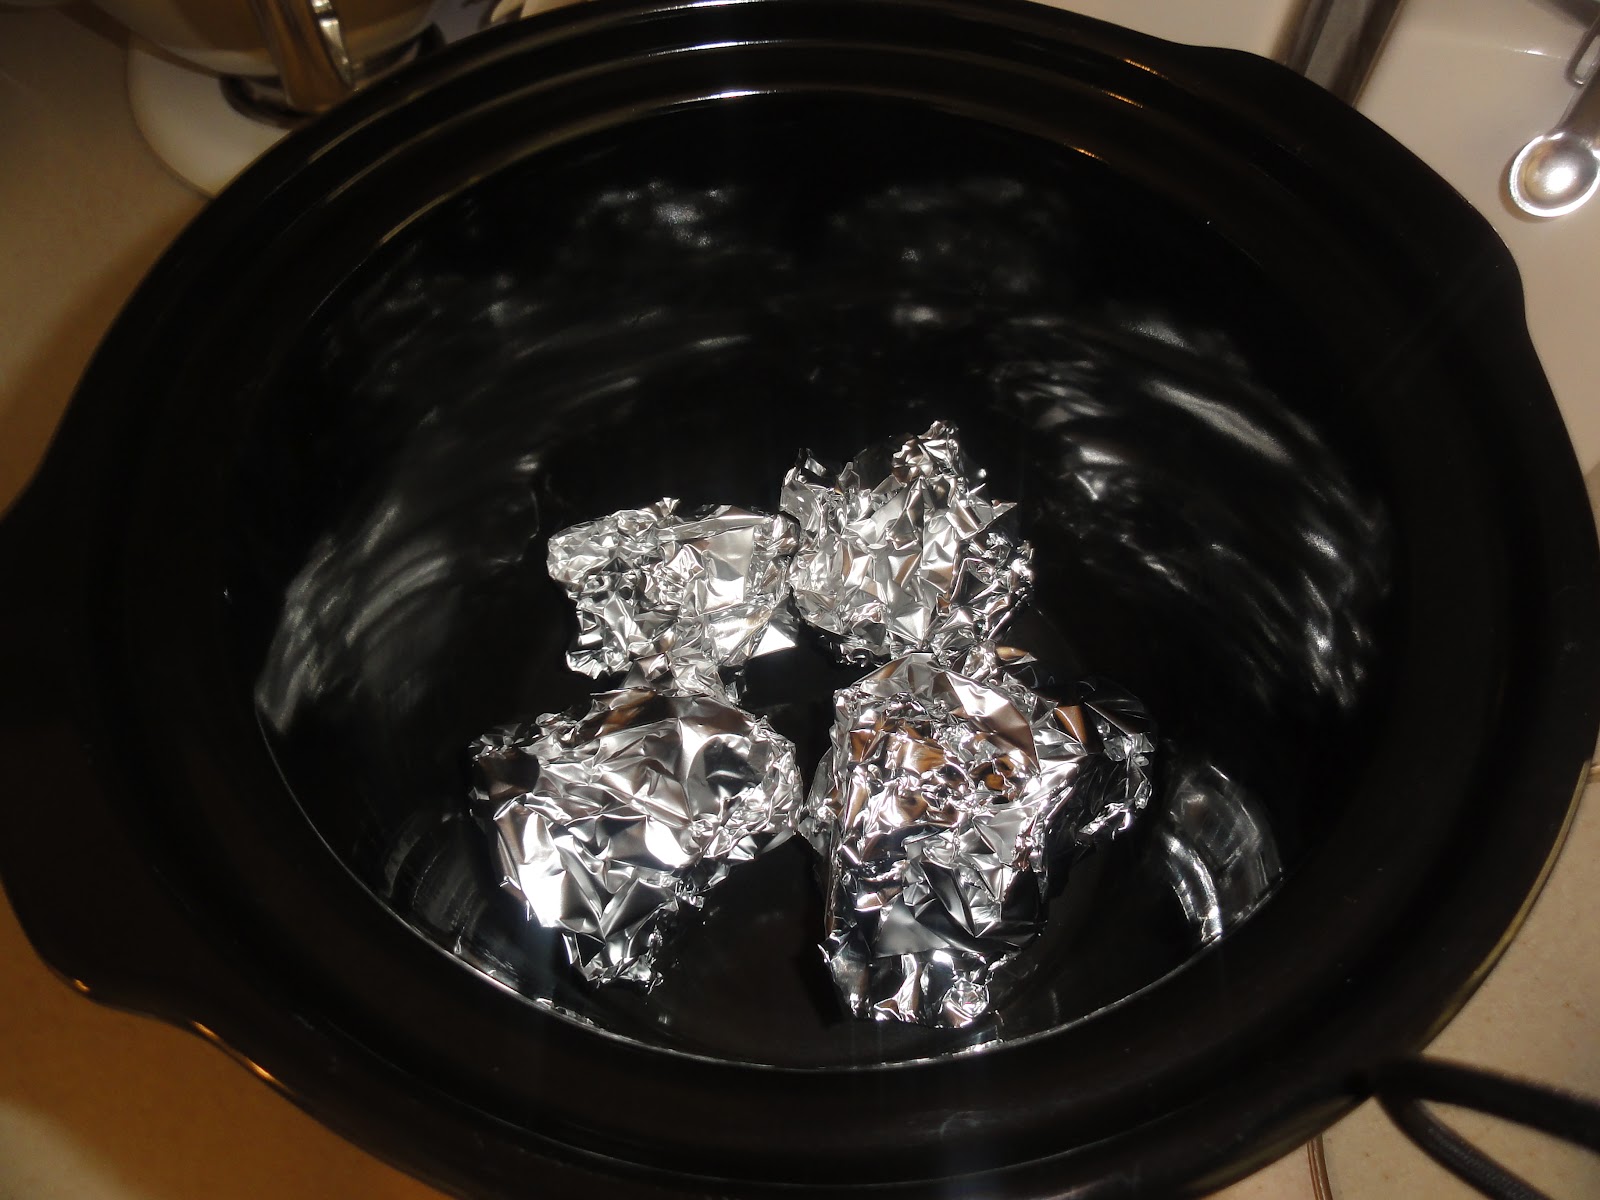
First, I took my crock pot and waded up a few balls of tin foil. I put the tin foil on the bottom of the crock pot, like this:
At first I was like "This is kind of kooky..." but it all makes sense to me now that I've tried it. One smart lady commented on the recipe that sometimes she wraps potatoes in the foil and cooks them with the chicken. Who woulda thunk it, right? Okay, let's carry on, shall we?
Next, I washed the chicken in cool water, sprayed it generously with olive oil cooking spray and sprinkled the entire thing (inside and out) with seasoning salt. (I used regular old Lawry's.) Also, note here that I left the skin on. The recipe didn't say anything about taking it off and I think it helped moisten the chicken as it cooked. Then, I put the chicken in the crock pot on top of the foil balls---back-side down. (Not sure why that is important but, hey, I'm following directions here.)
I was using my medium-sized 4-quart crock and it fit like a glove. The recipe said to cook it on HIGH for 4-6 hours. After four hours, I checked the temperature of it and it was done. Thirty minutes later when I decided it was supper time, it was falling apart when my husband tried to take it out. Perfect, if you ask me! It wasn't dry, and it was just right. Some of the skin was cooked like you'd see on a rotisserie chicken and some wasn't. My husband commented that you could really do anything you want to this recipe and add whatever flavors you like. He even wants me to try it just the same but with pouring a beer in the bottom of the crock so it kind of has a "beer-can chicken" flavor to it. Definitely one to experiment with and I'll certainly be cooking this more often. Also, keep in mind that the chicken was so good that it would also be perfect for pulled chicken sandwiches or using the chicken for a buffalo dip or a salad. Really, the possibilities are endless and knowing how cost-effective this meal is, it's sure to be a hit with your family and your wallet. :)
Wednesday, December 28, 2011
Salsa Chicken
Cooking Time: 6 hours
Yield: 4 servings
1 lb. boneless skinless chicken breasts
1 can cream of chicken soup
1 C. salsa
1 packet taco seasoning (or about 1 T. of homemade seasoning)
1 C. sour cream
Place chicken, soup, and salsa in crock pot. Sprinkle taco seasoning on top. Cook on low for 6 hours. Take chicken out of crock pot, shred and put back. Add sour cream and cook just until heated through. When serving, top with cilantro, black beans, extra sour cream, or whatever you like.
First off, one cup of sour cream is a bit much for me, so I add about half that. I also have tried this with cream of mushroom soup and it tastes just as great. I've been using my Mix 'n' Chop tool a lot lately and have found that I can just use that to break up the chicken, without even taking the chicken out of the crock pot. SO EASY!! I like to eat this over rice, which is how the original recipe recommends serving this. My husband took this one step further and puts it in a tortilla, like an enchilada. Oh, the possibilities!!
Family Chef's Grade: A
Tuesday, December 20, 2011
Chicken & Dumplings (in the crockpot)
1 lb. skinless boneless chicken breasts
2 cans cream of chicken soup (condensed)
3-1/2 C. chicken broth
2 T. butter
1 onion, chopped
4 carrots, chopped
4 stalks celery, chopped
1 package gnocchi
Put all ingredients (except gnocchi) in a crockpot and cook on low for 7 to 8 hours (until chicken is cooked through). Break chicken up in crock (or take out and shred). Add gnocchi and cook for about another hour.
Yield: 4 large servings
I originally saw this recipe on the Crockin' Girls but made it my own with the gnocchi. I tried it with refrigerator biscuits the first time I made it but didn't like the consistency of them when they were cooked. With the gnocchi, it's already formed and it's also made from potato, so maybe it's just a little bit healthier? Who knows, but it sure tastes good!! It's a great cold-weather/comfort-food meal that's easy and requires things that I usually have on hand already.
Family Chef's Grade: B+
Thursday, July 14, 2011
Chicken & Quinoa Salad with Tomatoes
1 C. dry quinoa (rinsed) with 2 C. water
1 C. red cherry tomatoes (halved)
1/2 C. chopped parsley (or to taste)
1/3 C. chopped chives (or to taste)
10 oz. rotisserie chicken breast, diced small
1 T. extra virgin olive oil
2 T. lime juice
2 T. cider vinegar
1 garlic clove, chopped
1/8 tsp. ground black pepper (or to taste)
Lettuce
Combine quinoa and water in a saucepan. Bring to a boil. Cover, reduce heat and simmer 10 minutes or until the liquid is absorbed. Remove from heat. Let stand 10 minutes. Fluff with a fork. Combine the quinoa, tomatoes, parsley, chives and chicken. Combine the oil, lime juice, vinegar, garlic and pepper. Drizzle over the salad. Mix well and chill. To serve, place a cup of chopped lettuce on a place and top with 1/3 cups of the chicken/quinoa salad. Serves 5.
Have you ever had (or heard of?!) "quinoa" before? I'll tell you right now that it's pronounce "keen-wah". I'm tell you this so you're not like me and walk into a store asking for it by the pronunciation you'd expect it to be! Luckily, the person at the store said, "Common mistake!" and we both laughed about it. I'm glad I know how to pronounce it now because I'll be buying this more often!! Quinoa is a grain--like rice or couscous--but different. If you haven't tried it, I say go for it! Plus, you'll need it for this amazing summer-time salad!! I LOVED this salad and will probably make it all the time for myself. This recipe was attached to an email that I got from my gym, so you know it's healthy. The serving size suggested is only 185 calories, which is good because I ate WAY more than 1/3 C. for dinner! Also, we were too hungry when I made this so I didn't let it chill for very long. It was warm over the lettuce and I almost like that better. The next day, I tried to eat it chilled over lettuce for lunch but ended up heating it up a little instead. I love it!! I would have given this an A+ but I have to consider my husband's opinion, too. He's a meat and potatoes kinda guy so he gave this a B. (BTW, leftovers keep very well in the fridge!)
Family Chef's Grade: B+
Thursday, May 5, 2011
Smokin'-Filled Chicken Breasts
Prep: 30 minutes
Bake: 20 minutes
Yield: 4 servings
1 pkg. cream cheese, softened (8 oz)
1/2 C. finely chopped fully cooked smoked ham
2 green onions, chopped
1 T. minced chipotle pepper in adobo sauce
1/2 tsp. salt
1/2 tsp. smoked paprika
4 boneless skinless chicken breast halves (6 oz. each)
1/3 C. flour
1 egg, beaten
1 C. panko bread crumbs
1/4 C. canola oil
Family Chef's substitutions: I could not find "chipotle pepper in adobo sauce" so I used Chalula chipotle hot sauce instead.
In a small bowl, combine the first six ingredients; set aside. Cut a pocket in the thickest part of the chicken breast; fill with cream cheese mixture. Secure with toothpicks.
Place the flour, egg and bread crumbs in three separate shallow bowls. Coat chicken with flour, then dip in the egg mixture, and coat with crumbs.
In a large skillet, brown chicken in oil; transfer to an ungreased baking sheet. Bake at 400* for 20-25 minutes or until a meat thermometer reads 170*. Discard toothpicks before serving.
Isn't everything better with cream cheese?! I certainly think so. This was SUPER tasty and my family loved it---even the kiddos. My daughter exclaimed that there were "pink things" in her chicken but was happy to find out that the "pink things" were little chunks of ham. (Dinnertime humor at our house!) This was a hit for us. My husband commented that we could really add anything to this recipe, which is exactly what he said when I made stuffed chicken a couple months ago for a different recipe. Just goes to show, I don't play around enough with these yummy ideas! :)
Family Chef's Grade: A-
Maple Pretzel Chicken
***This recipe was found in Taste of Home magazine, submitted by Tara Szlag of Columbus, OH***
Prep/Total Time: 20 minutes
Yield: 4 servings
4 boneless skinless chicken breast halves (5 oz. each)
1 egg
1/2 cup maple syrup
1-1/2 cups crushed pretzels
1/4 cup canola oil
Flatten chicken breasts to 1/2-inch thickness. In a shallow bowl, whisk egg and syrup. Place pretzels in separate shallow bowl. Dip chicken in egg mixture, then coat with pretzels.
In a large skillet, cook chicken in oil over medium heat for 5-6 minutes on each side or until juice run clear.
First off, you need to know that your pretzels need to be FINELY crumbled. The coarser they are, the harder they will be to coat the chicken. That said, I did finely crush mine. HOWEVER, I considered this recipe a "fail" the night I did it. I did everything according to the recipe and ended up with the coating not staying on the chicken when it cooked. It smelled amazing and even tasted great (especially to my 5-year old who thought it was "so cool" that he got to have maple syrup and pretzels on his chicken). The end result isn't too sweet, which is great, and it's a tasty combination. I just didn't like the process so I guess I need to play around with it more.
Family Chef's Grade: Taste: B+ Process: C
Wednesday, April 27, 2011
Rosemary Mushroom Chicken
***This recipe was found in Taste of Home magazine, submitted by Genny Monchamp of Redding, CA***
Prep: 30 minutes Cook: 7 hours
Yield: 6 servings
6 chicken leg quarters, skin removed
2 C. sliced fresh mushrooms
2 cans (10-3/4 oz each) condensed cream of mushroom soup, undiluted
1/2 C. white wine or chicken broth
1 tsp. garlic salt
1 tsp. dried rosemary, crushed
1/2 tsp. paprika
1/8 tsp. pepper
Hot cooked egg noodles, optional
Place chicken in a 5- or 6-quart slow cooker coated with cooking spray; top with mushrooms. Combine the soup, wine, garlic salt, rosemary, paprika and pepper; pour over top. Cover and cook on low for 7-9 hours or until chicken is tender. Serve with noodles, if desired.
I used a mild sauvignon blanc for the wine portion of this recipe. It was quick and easy to throw in the crock pot in the morning and I let it cook for 7 hours. HOWEVER, the meat was completely falling off the bone (almost too done in this case) so next time I am only going to let it cook for 6 hours. Also, my family of four devoured all six leg quarters. Since the package I bought came with eight, I think I'll make all eight next time. Very yummy and convenient dish!!
Family Chef's Grade: B+
Broccoli Chicken Stir-Fry
***This recipe was found in Taste of Home magazine***
Prep/Total Time: 30 minutes
Yield: 4 servings
1 medium spaghetti squash
SAUCE:
1 C. chicken broth
3 T. soy sauce
2 T. sugar
2 T. cornstarch
2 T. cider vinegar
1/8 tsp. crushed red pepper flakes
STIR-FRY:
1 egg
1 T. soy sauce
1/2 C. cornstarch
1 lb. boneless skinless chicken breasts, cut into 1-in. cubes
1/4 C. canola oil
2 C. fresh broccoli florets
1 medium onion, chopped
Cut squash in half lengthwise; discard seeds. Place squash cut side down in a microwave-safe dish. Microwave, uncovered, on high for 12-15 minutes or until tender.
Meanwhile, in a small bowl, combine broth, soy sauce, sugar, cornstarch, vinegar and red pepper flakes until smooth. Set aside.
In a shallow bowl, whisk egg and soy sauce. Place cornstarch in another shallow bowl. Dip chicken in egg mixture then coat with cornstarch. In a large skillet or wok, stir-fry chicken in oil in batches until no longer pink. Remove and keep warm.
Stir-fry broccoli and onion for 2-3 minutes or until crisp-tender. Stir the sauce mixture and add to the pan. Bring to a boil; cook and stir for 1-2 minutes or until thickened. Add the chicken; heat through.
When the squash is cool enough to handle, use a fork to separate strands. Serve with stir-fry.
I really wish I would have remembered to take a picture of this dish because the instructions don't tell you how to really serve it: the stir-fry goes OVER the squash, so you use the squash instead of rice!! I love love love squash (almost any kind) so I just had to try this out. My husband loved it because he never wants to eat the rice anyways since he's not big on carbs. What a fantastic option that I never would have thought of myself!! The only tedious part of this recipe was coating the chicken in the cornstarch. Maybe because most of the recipes I try call for tossing the meat in a baggie with the cornstarch or maybe I was in a crabby mood---either way, the process of coating the chicken and putting it in the skillet about drove me crazy. Next time, I'm going the baggie route!
Family Chef's Grade: A-
Thursday, April 14, 2011
Mixed Paella
***This recipe was found in Taste of Home magazine, submitted by Libby Walp of Chicago, IL***
Prep/Total Time: 30 minutes
Yield: 6 servings
1-1/4 lb. boneless skinless chicken breasts, thinly sliced
2 T. olive oil
1 medium onion, chopped
2 garlic cloves
2-1/4 C. chicken broth
1 C. uncooked long grain rice
1 tsp. dried oregano
1/2 tsp. turmeric
1/2 tsp. paprika
1/4 tsp. salt
1/4-1/2 tsp. pepper
1 lb. cooked medium shrimp, peeled and deveined
1 can (14-1/2 oz) diced tomatoes, undrained
3/4 C. frozen peas, thawed
1/2 C. sliced pimento stuffed olived
**Family Chef's substitutions: I used my favorite Basmati rice instead of the long grain, so I cooked it separately and added it to the skillet with only one cup chicken broth (instead of 2-1/4 cups). I also did not let it simmer as long.
In a large skillet, saute chicken in oil until no longer pink. Remove and keep warm. In the same skillet, saute onion until tender. Add garlic; cook 1 minute longer. Stir in the broth, rice and seasonings. Bring to a boil. Reduce heat; cover and simmer for 15-18 minutes, or until rice is tender.
Stir in the shrimp, tomatoes, peas, olives and chicken. Cover and cook for 3-4 minutes or until heated through.
I have never had paella before but my husband knew all about it since he took Spanish in high school. (I didn't even know that this was a Spanish dish!!) This meal really got some mixed reviews by my family. First off, the combination of flavors is a little too much. I love all the color that it offered:
However, my husband said that he could do without the olives in it. He also expected it to be spicy which it was not. I wasn't sure if I even like the turmeric flavor, so I wasn't sure I could give this dish a fair grade. After my kids chowed down on the chicken and shrimp (they wouldn't eat the rice), we decided to give this a B. Also note that for leftovers the next day, I put some cayenne pepper in it and made it spicy. It was WAY better that way, so at least I know what to add next time!
Family Chef's Grade: B
Monday, April 11, 2011
Asparagus-Stuffed Chicken Breasts
***This recipe was found in Simple & Delicious magazine.***
Prep/Total Time: 25 minutes
Yield: 2 servings
2 boneless, skinless chicken breast halves (6 oz each)
1 T Dijon mustard
1 green onion, finely chopped
10 asparagus spears, trimmed
3 T crushed, butter-flavored crackers
Hollandaise Sauce:
1/4 C butter, cubed
2 egg yolks
2 tsp. lemon juice
1 tsp. water
1/8 tsp. salt
1/4 C sliced almonds, toasted
Flatten chicken to 1/4-inch thickness. Spread with mustard; sprinkle with onion. Place asparagus spears down the center of the chicken; fold over and secure with toothpicks if necessary.
Place seam side down in an ungreased 8-inch microwave-safe dish. Sprinkle with cracker crumbs (all over top of chicken). Microwave, uncovered, on high for 6-8 minutes, or until chicken juices run clear. Keep warm.
For sauce, in a small microwave-safe bowl, melt butter. Gradually whisk in egg yolks, lemon juice, water, and salt. Microwave, uncovered, at 30% power for 30 seconds, or until mixture reaches 160 degrees and is thickened, stirring once. Spoon over chicken. Sprinkle with almonds. Remove toothpicks.
I have to say, I was once again surprised to be making a microwave dish, but I guess I've got to get used to that when cooking from this magazine. This was VERY yummy. My husband loved the mustard on the chicken and I loved the hollandaise sauce. HOWEVER, as you can see from the picture above, my hollandaise got a bit TOO thick. I thought I did the instructions exact, but I think our microwave was on too high of power. (We got a new microwave recently and I'm still learning all the ins and outs of it.) It wasn't as smooth as I wanted it to be, but it tasted delicious! Can't wait to try this again!
Family Chef's Grade: A
Wednesday, March 30, 2011
Chicken Wellington
***This recipe was found in "Simple & Delicous" magazine***
Prep: 30 minutes Bake: 20 minutes + standing
Yield: 4 servings
4 boneless skinless chicken breast halves (6 oz. each)
1 T olive oil
2 T butter, softened, divided
1 tsp dried rosemary, crushed
1/2 tsp rubbed sage
1/4 tsp salt
1/4 tsp pepper
2 packages (15 oz each) refrigerated pie pastry
1 egg, lightly beaten
Sauce:
1-1/4 tsp chicken bouillon granules
1-1/4 cups hot water
2 T butter
3 T flour
2 T white wine OR chicken broth
Flatten chicken to 1/4-inch thickness. In a large skillet, cook chicken in oil and 1 tablespoon butter for 4-5 minutes on each side, or until juices run clear.
Meanwhile, in a small bowl, combine the rosemary, sage, salt, pepper and remaining butter. Unroll pastry sheets; cut into 9-inch square (discard scraps). Place a chicken breast half on each square; spread chicken with butter mixture. Fold pastry over chicken. Trim off excess pieces; pinch seams to seal.
Place on a greased baking sheet; brush with egg. Bake at 450* for 18-20 minutes or until golden brown. Let stand for 10 minutes before serving.
Meanwhile, dissolve bouillon in hot water. In a small saucepan, melt butter; stir in flour until smooth. Gradually stir in bouillon and wine (or broth). Bring to a boil; cook and stir for 2 minutes or until thickened. Serve with chicken.
This was really easy and really tasty. My whole family loved it! One problem was that I used a little extra pie pastry (that's the carb-monger in me) and ended up not baking it for quite long enough. The chicken was done, the pie pastry was flaky on top, but a little doughy next to the chicken. My family didn't complain and there were no leftovers sitting at the table when we were done. Also, know that because the chicken you place on the pastry is hot, it will melt the pastry a little bit and it will be extra doughy as you place the covered chicken in the baking dish. Just so you can be warned! :)
Family Chef's Grade: B+
Thursday, March 17, 2011
Apricot Chicken
***This recipe was found in "Simple & Delicious" magazine, submitted by Vicki Ruiz of Twin Falls, Idaho***
1/2 C apricot preserves
2 T soy sauce
1 T chicken broth OR sherry
1 T vegetable oil
1 T cornstarch
1 tsp minced garlic
1/2 tsp ground ginger
1 pound boneless skinless chicken breasts, cut into strips
1 medium green pepper, chopped
1/2 C salted cashews
Hot cooked rice
In a large bowl, combine the first seven ingredients. Add chicken and toss to coat. Transfer to a shallow microwave-safe dish. Cover and microwave on high for 3 minutes, stirring once.
Add green pepper and cashews. Cover and microwave on high for 2-4 minutes or until chicken juices run clear, stirring once. Let stand for 3 minutes. Serve with rice.
Yield: 4 servings
I was a little surprised to see that this recipe suggested everything be cooked in the microwave. I guess I should have guessed it since "Simple and Delicious" really DOES have simple recipes that are good. It was kind of funny to pull everything out of the fridge and say to my husband, "Dinner will be ready in about 10 minutes!" He didn't believe me, but, alas, it was! I made "instant rice" instead of my favorite basmati which made this a SUPER quick and easy recipe. My family liked it a lot!
Family Chef's Grade: B
Thursday, March 10, 2011
Chicken in Wine Sauce
***This recipe was found in Taste of Home magazine, submitted by Kathleen Valle of Philadelphia, PA***
Prep/Total Time: 25 minutes
Yield: 4 servings
4 boneless skinless chicken breast halves (5 oz each)
1 egg
1 T. water
3/4 C. flour
1/2 tsp. salt
1/2 tsp. pepper
3/4 lbs. sliced fresh mushrooms
2/3 C. plum wine
Flatten chicken to 1/4-inch thickness. In a shallow bowl, whisk egg and water. In another shallow bowl, combine flour, salt and pepper. Dip chicken in egg mixture, then coat with flour mixture.
In a large nonstick skillet coated with cooking spray, cook chicken over medium heat for 4-5 minutes on each side, or until juices run clear. Remove and keep warm.
In the same skillet, saute mushrooms until tender. Add wine, stirring to loosen browned bits from pan. Bring to boil; cook until liquid is reduced by half. Serve with chicken.
I had a hard time getting the chicken to cook without there still being white flour on it, so I did add a little oil to the pan to soak it up on the chicken. Otherwise, this was a really straight-forward recipe. My husband even asked what was in it when he came home from buying the plum wine and I said, "plum wine and mushrooms---that's it!" The man at the liquor store warned that the plum wine is VERY sweet, but in the end this whole thing wasn't too sweet for my pallet. In fact, it was less sweet than the Cider Pork Chops.
Family Chef's Grade: B
Wednesday, March 2, 2011
Chicken and Artichoke Pasta
***This recipe was found in Taste of Home magazine, submitted by Laurel Johnson of Sterling Heights, MI***
Prep/Total time: 30 minutes
4 cups uncooked bow-tie pasta
1 lb chicken tenderloins, cut into 1-inch pieces
2 T. olive oil
1/2 lb. sliced fresh mushrooms
1/2 C chopped green onions
2 T. white wine or chicken broth
1 can (14 oz) diced tomatoes with roasted garlic, undrained
1/4 tsp salt
2 tsp cornstarch
2 tsp cold water
1 T. thinly sliced fresh basil OR 1 tsp. dried basil
1/2 C shaved parmesan cheese
Cook pasta according to package directions. Meanwhile, in a large skillet, saute chicken in 1 T. oil until no longer pink. Remove and keep warm.
In the same skillet, saute mushrooms and onions in remaining oil until tender. Add wine, stirring to loosed browned bits from pan. Reduce heat to medium. Stir in the tomatoes, artichokes, salt and chicken. Cook and stir for 4-5 minutes or until heated through.
Combine cornstarch and water until smooth. Gradually stir into pan. Bring to boil. Cook and stir for 1 minute or until thickened. Stir in basil. Drain pasta; serve with chicken mixture on top and cheese.
Yield: 5 servings
I will try ANY recipe that has artichokes in it, I'm just telling you right now. I love love love them! My husband helped me make this one and the whole time, we were both commenting on how yummy it smelled. I doubled the recipe because I knew that my hubby would like to eat it without the pasta. With or without it, we both gave this recipe the same grade. It was good but not GREAT in our opinion. It was also really easy. I used dried basil and it really did add something to it in the end. I also didn't care for the left-overs when I heated them up today, which was funny because I normally love left-overs. Maybe it was just my mood??
Family Chef's Grade: B+
Tuesday, February 22, 2011
Kickin' Buttermilk Faux-Fried Chicken
***This recipe was found in People magazine, submitted by Lisa Lillien.***
Bake time: 20 minutes
1/3 C reduced-fat buttermilk
1/8 tsp. paprika
12 oz. boneless, skinless chicken breast tenders (about 8-10 pieces)
1/3 C twig-shaped bran cereal
1/3 C panko bread crumbs
1 T. dry onion soup mix
Salt to taste (optional)
***Family Chef's substitutions: I used Chex multi-bran cereal instead of the twig-shaped bran cereal.
Combine buttermilk and paprika in a large ziplock plastic bag. Mix well. Ad chicken tenders. Toss to coat completely.
Refrigerate for a minimum of 1 hour.
Preheat oven to 375*.
Process cereal in a food processor until it reaches a fine-crumb consistency. Combine cereal crumbs and remaining ingredients in a large shallow bowl.
Drain chicken tenders and discard buttermilk. Coat each tender with crumb mixture and arrange on a lightly greased baking sheet.
Bake 20 minutes or until crisp and done, turning once after 10 minutes.
This was a really fun recipe to make but it was lacking in something, in my opinion. I really think it's because they weren't greasy and oily, which is kind of sad if you think about it! Definitely healthier than regular fried chicken, so I might try it again. The onion soup really gave it a sweet flavor---so much so that my husband thought there was coconut on the tenders!! I'll make it again....but I might add a little bit of oil. :)
Family Chef's Grade: B
Thursday, February 10, 2011
Cornish Game Hens
***Recipe found in Simple & Delicious magazine, submitted by Kara De La Vega of Santa Rosa, CA***
Prep Time: 15 minutes
Bake Time: 35 minutes
Yield: 4 servings
1/2 tsp. sal
1/2 tsp. dill weed
1/2 tsp. dried oregano
1/2 tsp. pepper
1/4 tsp. paprika
2 Cornish game hens (20-oz each), split lengthwise
1 T. olive oil
1/4 cup chopped green onions
1/2 tsp. minced garlic
1/2 cup chicken broth
1/4 cup orange juice concentrate
2 T. slivered almonds, toasted
1 T. minced fresh parsley
In a small bowl, combine the first five ingredients; sprinkle over hens. In large skillet, cook hens over medium-high heat in oil until browned on both sides. Transfer to an ungreased 13x9-inch baking dish; set aside and keep warm.
In the same skillet, saute green onions and garlic until tender. Stir in broth and orange juice concentrate; pour over hens. Bake, uncovered, at 350* for 35-40 minutes or until meat is tender and juices run clear. To serve, drizzle with pan juices and sprinkle with almonds and parsley.
This was my first time working with game hens and it was a fun experience!! The kids call them "Cute Chickens" now because they are just so little. The kids also had fun watching me mix the spices tonight so I gave them a little lesson in what everything is called. My son was amazed with the color of the paprika so that was kind of funny! Anyway, the recipe was really good and really general, so I think I'll try this on regular chicken pieces next instead of doing the game hens again. It's very basic in the event that you are looking for something to spice up regular chicken.
Family Chef's Grade: B
Subscribe to:
Posts (Atom)